In this article
- What does my Fastfetch screenshot show?
- The three files in my repository
- Start with a small test file
- Understand modules, borders and placeholders
- Display the image logo with Kitty
- Choose the right root, games and homelab paths
- What does the custom age counter mean?
- When an image, icon or data line is missing
- Choose which local details to publish
- Configuration and checked references
A terminal can offer more than an empty prompt. Fastfetch gives me a compact overview of Cthulhu's system, hardware, memory and disks. My setup combines a custom image logo with a framed list, and the files are public in the Cthulhu repository.
This guide includes the actual screenshot, explains the configuration piece by piece and starts beginners with a small test file. You can reuse the design while adapting the details to your computer. The underlying system file has its own NixOS introduction.
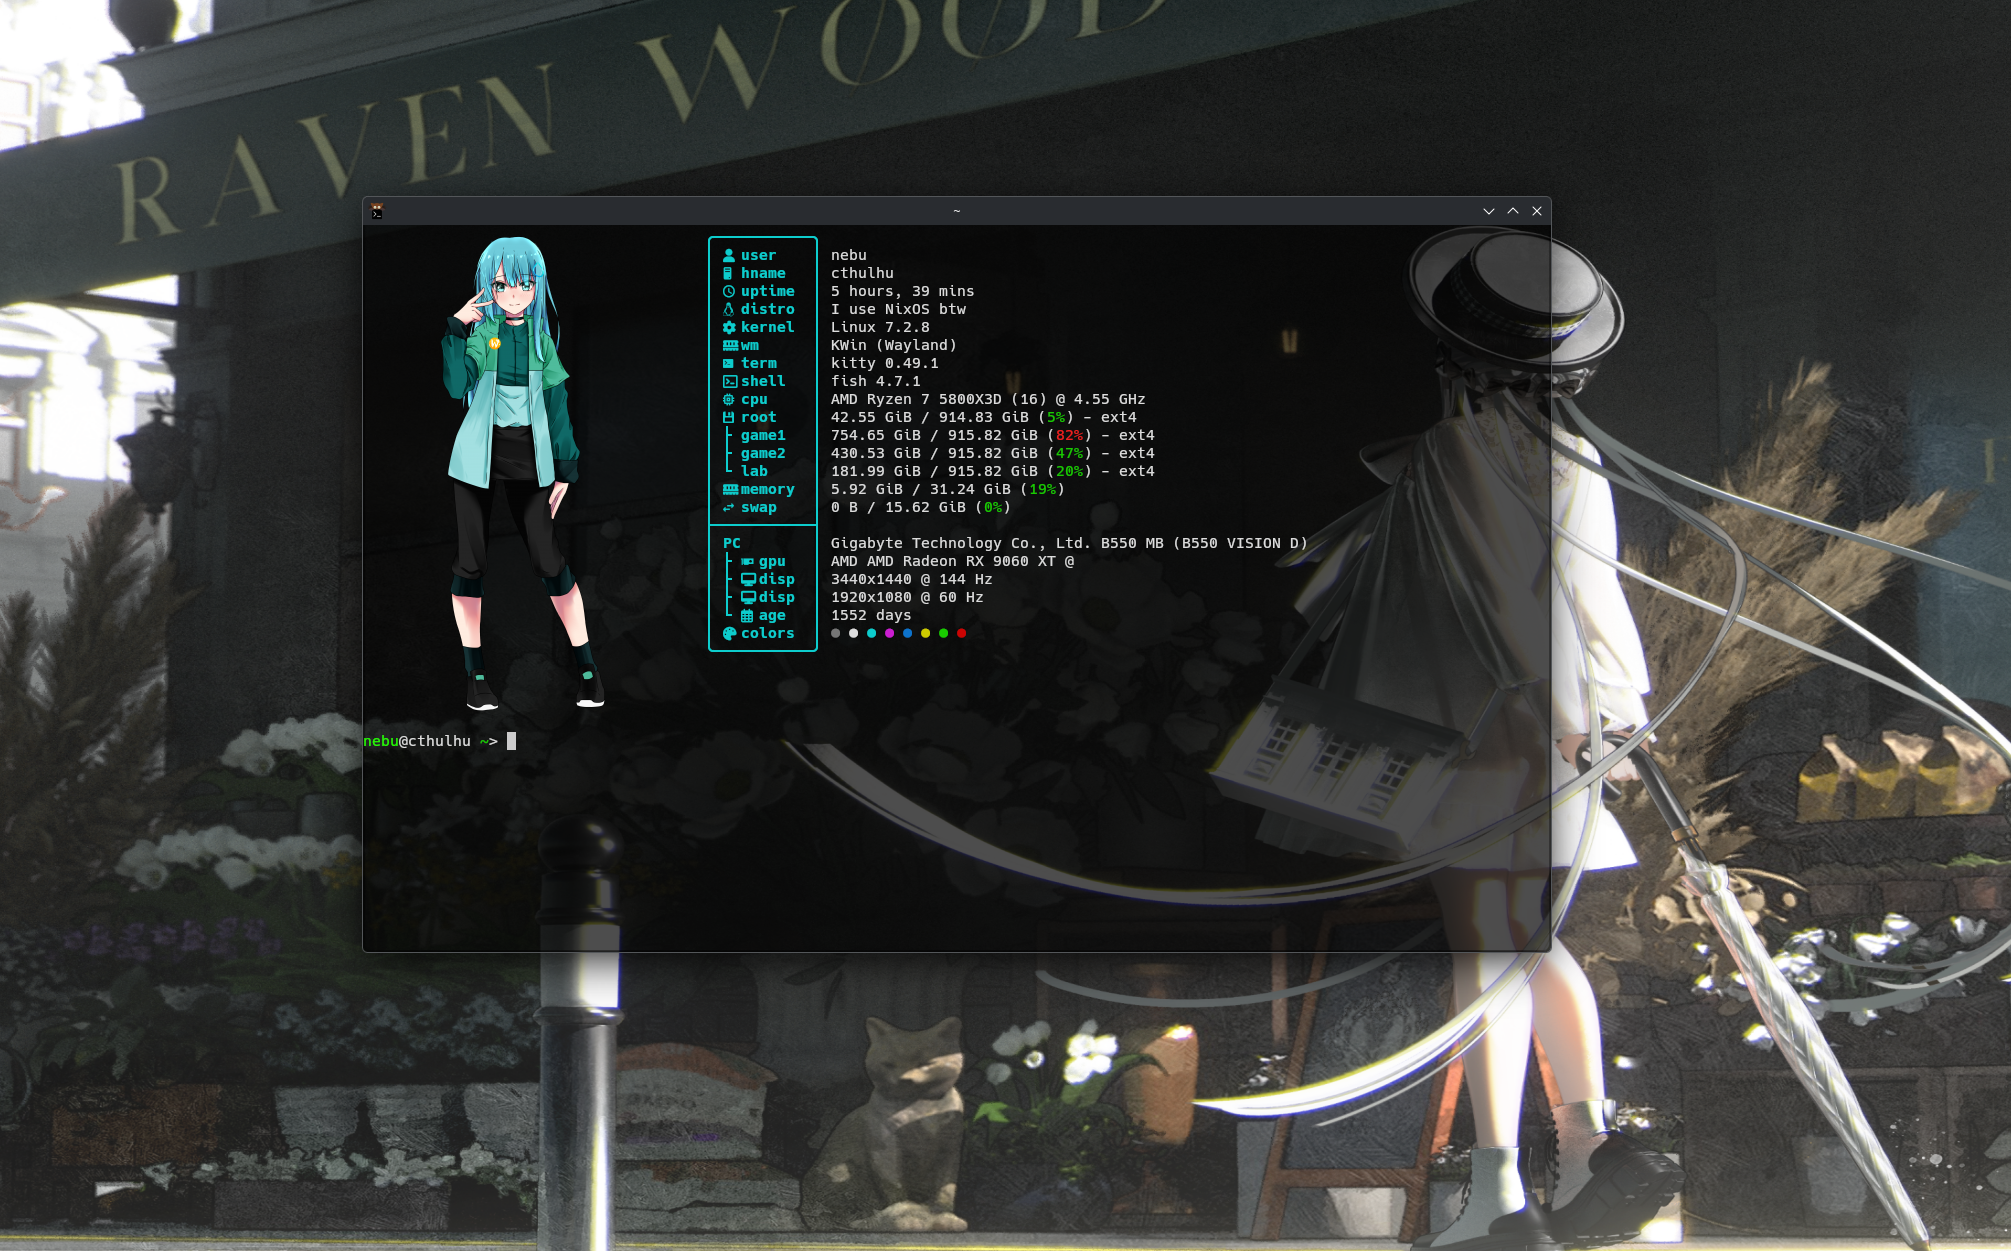
What does my Fastfetch screenshot show?
The image file sits on the left and the system overview on the right. The screenshot shows my user nebu, the hostname cthulhu, Linux 7.2.8, KWin on Wayland, Kitty and fish. It also includes the Ryzen 7 5800X3D, Radeon RX 9060 XT, two displays, memory usage and several disks.
This arrangement helps identify a computer quickly and document a setup. Memory usage, disk usage and uptime change over time. Fastfetch provides a snapshot here; reproducible performance testing requires additional tools and controlled conditions.
The I use NixOS btw line is explicitly written into my OS module as a format string. It is personal branding. When using this file on another system, change the text or remove that custom format to let the module use its normal operating-system output.
The three files in my repository
| File | Purpose |
|---|---|
config.jsonc | Display order, labels, formats and logo settings |
1.png | The image shown beside the system details |
cthulhu-born | An empty marker file; its modification time provides the reference for the age counter |
The usual configuration path is ~/.config/fastfetch/config.jsonc. A custom XDG_CONFIG_HOME can change the default search location; my published image path and age command explicitly target ~/.config/fastfetch. Check these personal paths when adapting the setup.
JSONC is JSON with comments. The examples here are valid plain JSON too. $schema supports suggestions and validation in compatible editors. The linked development schema can change, and your installed Fastfetch version also determines which options are available.
Start with a small test file
You need an installed copy of Fastfetch. Check its version:
fastfetch --versionOn NixOS you can add fastfetch to your package list; the NixOS article explains the process. Create a separate practice directory:
mkdir -p ~/fastfetch-tutorialSave the following complete file in your editor as ~/fastfetch-tutorial/config.jsonc. If that folder already contains your own work, use another practice directory. This starting point uses a built-in text logo and needs neither image rendering nor Nerd Font icons:
{
  "$schema": "https://github.com/fastfetch-cli/fastfetch/raw/dev/doc/json_schema.json",
  "logo": {
    "type": "builtin",
    "source": "nixos"
  },
  "display": {
    "separator": " ",
    "color": {
      "keys": "cyan"
    }
  },
  "modules": [
    {
      "type": "custom",
      "key": "╭───────────╮",
      "format": ""
    },
    {
      "type": "title",
      "key": "│ user      │",
      "format": "{user-name}"
    },
    {
      "type": "os",
      "key": "│ distro    │"
    },
    {
      "type": "kernel",
      "key": "│ kernel    │"
    },
    {
      "type": "memory",
      "key": "│ memory    │"
    },
    {
      "type": "custom",
      "key": "╰───────────╯",
      "format": ""
    }
  ]
}
Run this file explicitly:
fastfetch --config ~/fastfetch-tutorial/config.jsoncYou should see a NixOS text logo and four framed data lines. On another Linux system, selecting this logo does not change the detected distribution: it is a design choice. Fastfetch exits after printing; it does not create a persistent dashboard. This test leaves your regular configuration in place.
Understand modules, borders and placeholders
The entries in modules print in their listed order. type selects the data source, key designs the label on the left, and format controls the output on the right. My borders are custom entries using Unicode characters; they do not collect hardware information themselves.
| Building block | Example from my setup |
|---|---|
title | Separate lines for {user-name} and {host-name} |
uptime, kernel, wm | Uptime, kernel and detected window manager |
terminal, shell, cpu | Terminal, shell and processor |
disk, memory, swap | Filesystem usage, RAM and swap |
host, gpu, display | Computer/mainboard information, graphics card and displays |
colors | Colored circles from the terminal palette |
The small icons in my original require suitable glyphs, typically provided by a Nerd Font. Select that font in your terminal. If you see empty boxes, replace the icons with text first. The simplified example still keeps the border characters.
Some of my hardware formats use numbered placeholders. In the checked reference, the host format {5} {1} ({2}) means vendor, product family and product name. The GPU format's {12} refers to frequency. An empty space after @ in the screenshot can simply mean that the value was unavailable.
Named placeholders can make your own formats easier to read. Check the list for your installed version:
fastfetch -h gpu-formatFor a small exercise, change only "keys": "cyan" to "keys": "green" in the test file, save it and run it again. The labels should turn green. To undo the change, set the value back to cyan.
Display the image logo with Kitty
My original points to /home/nebu/.config/fastfetch/1.png and selects kitty-icat for image output. This method uses kitten icat, which comes with Kitty. This setup needs Kitty-compatible image rendering and an available kitten program.
The repository places logo options such as logoType and logoWidth at the top level. The documentation and schema checked on 7 October 2026 put these settings inside a logo object. Use the documented structure for a current configuration:
{
  "logo": {
    "type": "kitty-icat",
    "source": "/home/nebu/.config/fastfetch/1.png",
    "width": 30,
    "height": 15,
    "padding": {
      "top": 1,
      "left": 2,
      "right": 4
    }
  }
}
This is a fragment: it replaces the existing logo entry in the test file. When adapting the original, also remove the separate logoType, logoWidth, logoHeight and logoPadding entries. Otherwise, Fastfetch may report unknown options.
Replace the image path with the absolute path on your computer. width and height reserve terminal columns and rows, not CSS pixels. Padding gives the image and data list room; changing the font size or window dimensions changes the result.
You can find 1.png in the Fastfetch directory. To inspect the repository locally, clone it:
git clone https://github.com/dennishilk/cthulhu.gitThen open cthulhu/Fastfetch/fastfetch/ and read the configuration before running it. You can use the included image or your own graphic. For a text terminal, keep the built-in logo from the first example.
Choose the right root, games and homelab paths
My four disk entries read /, /mnt/Games.Vol1, /mnt/Games.Vol2 and /mnt/Homelab. The names game1, game2 and lab are labels I chose to keep the overview compact.
{
  "type": "disk",
  "key": "│ ├ game1   │",
  "folders": "/mnt/Games.Vol1"
}
This is one entry for the modules array; remember the comma separating adjacent entries. Remove extra disk modules if you do not use those mountpoints, or enter your own paths. These settings do not mount any drives.
For an unexpected value, first check which filesystem actually contains the path:
findmnt -T /mnt/Games.Vol1An existing directory can still belong to the root filesystem when the intended drive is not mounted. A usage figure alone therefore does not confirm the expected mount. Correct paths make these disk lines useful for a reliable overview.
What does the custom age counter mean?
The counter uses a command module. My command reads the modification time of cthulhu-born with stat -c %Y, subtracts it from the current Unix time and divides the difference by 86,400. The result is whole days since that marker.
This is a personal reference point for Cthulhu, rather than automatic detection of the operating-system installation date. The empty file contains no date. A normal Git clone gives it a new filesystem timestamp. For your computer, choose a meaningful marker and preserve its timestamp in backups.
This variant displays n/a when the marker file is missing:
{
  "type": "command",
  "key": "│ └ age     │",
  "text": "if [ -f \"$HOME/.config/fastfetch/cthulhu-born\" ]; then start=$(stat -c %Y \"$HOME/.config/fastfetch/cthulhu-born\"); now=$(date +%s); printf '%s days\\n' \"$(((now - start) / 86400))\"; else printf 'n/a\\n'; fi"
}
It assumes the GNU stat syntax commonly used on Linux. Other Unix-like systems with different stat options need an adaptation. You can also leave the counter out entirely.
The name command is literal: Fastfetch executes the included command with your user permissions. My example only reads file and time information. Inspect the commands in configurations you download before running those files.
When an image, icon or data line is missing
- Unknown JSON option: Compare the reported setting with your Fastfetch version and the documented structure, especially the logo options.
- No image: Check the absolute file path, the terminal and the availability of
kitten. Test outside tmux first. - Boxes instead of icons: Select a suitable Nerd Font in the terminal or use plain text labels.
- Unexpected disk figures: Check the mountpoints and the underlying filesystem.
- Empty GPU frequency: Check supported format fields and whether that value is available; a missing value alone does not establish a hardware fault.
- Unexpected age: Check the marker's modification time, especially after cloning or restoring files.
Ask Fastfetch to show errors for the test file:
fastfetch --config ~/fastfetch-tutorial/config.jsonc --show-errorsIf image rendering still gets in the way, restore the built-in text logo from the first example. Before replacing your regular configuration later, back it up using the steps in the backup article. Closing the terminal and keeping your original file gives you the way back from this exercise.
Choose which local details to publish
The standard modules shown here read local information. The age command also uses local file and time data. This system overview requires no Fastfetch account. Downloading the Git repository and installing packages do require network access.
A shared screenshot can reveal usernames, hostnames, hardware, the kernel, disks and their usage. Choose your modules deliberately before publishing. My file contains no public-IP or weather query; later additions can contact external services. Custom command modules can also do more than read information.
A separate test file lets you learn the display and data sources first. You can then move the modules you need into your regular configuration and back it up together with the image and, if used, the marker file.
Configuration and checked references
My files and the official references were checked on 7 October 2026. The screenshot documents my actual desktop; the small test file is a separate learning example.